If the users need to generate a password for their Bigpond and then configure it in Outlook, they have to follow the steps listed below:
Generate Password:
- To generate the password, First of all the users have to login to Bigpond email account by using Bigpond email ID and password. After that the users have to go to Account settings.
- In the Account settings the users have to navigate for a section that is related to security or app password.
- After that the users have to look for an option to generate password and click on that option.
- The users have to follow the instructions provided by the system to create a new password. To identify the users later on if they forget the password, the system will ask information such as name or description.
- After generating the password the users have to save it. Remember the password that is generated will be used while configuring the email client.
Configure Bigpond mail in Outlook:
- Firstly the users have to turn on their computer and Microsoft Outlook should be launched.
- In the left corner go to the “File” option. After that, “Add Account” option will be visible where the users have to click on it.
- In the “Add Account” sections the users are required to select “Manually configure server settings” or “Additional server types” and tap on the “Next” button.
- An option will appear where the users have to choose “POP” or “IMAP” and press on the “Next” button.
- In the next step, a field will appear where the users have to fill up their account details such as their name and full Bigpond email address.
- The users have to choose the account type “IMAP” or “POP”. For syncing emails across multiple devices select “IMAP” and to download the emails to the computer without synchronization select “POP3”
- Based on the account type the users have to enter the appropriate server address.
- In incoming mail server use imap.telstra.com for IMAP and for POP3 use pop.telstra.com
- In Outgoing mail server (SMTP) use smtp.telstra.com
- In the users name field the users have to use their full email address.
- In the password field use the password that is generated by the password generator tool.
- After filling up the server address the users have to tap on the “More Settings” button.
- In the “Outgoing Server” tab, the users have to check the box that says “My outgoing server (SMTP) requires authentication”.
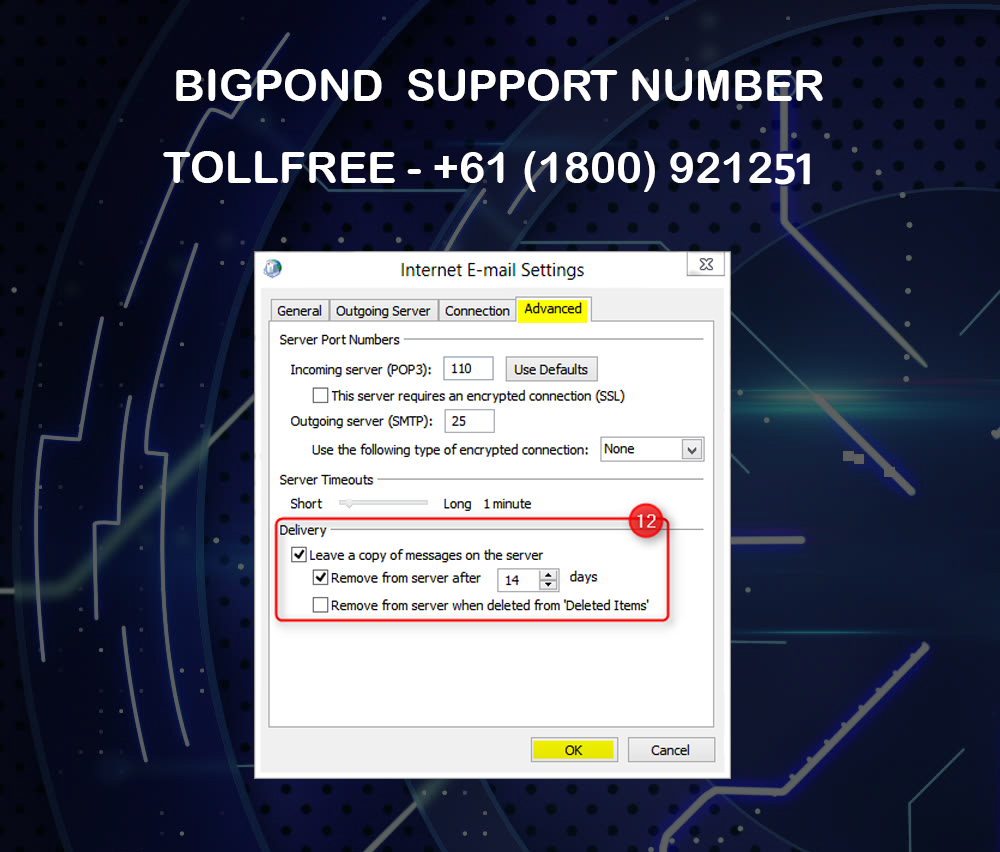
- The users have to switch to the “Advanced” tab and configure the following settings:
- For IMAP the incoming server (IMAP) must be 993 and the encrypted connection should be SSL/TLS
- For POP the incoming server (POP3) must be 995 and the encrypted connection should be SSL/TLS
- The outgoing server (SMTP) should be 587 and the encrypted connections should be STARTTLS
- Once the configuration is set up the users have to press on the “Next” button to let outlook test the account settings. If everything is correctly configured the users will receive a successful notification or message. Tap on the “Finish” button to complete the setup.
By the following steps the users account will be configured in outlook, using the password generated by password generator. Sometimes the updates may change the process so in that case contacting Bigpond customer care will be the best idea. The representatives of Bigpond will share the updated information to troubleshoot and resolve the issues.